
Sections in this Article:
Important: Version 5 of the software is NOT SUPPORTED by the original Espion system. If your system looks like the picture below, you cannot install version 5 of the software. 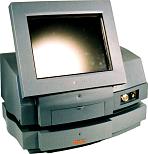
Step 1: Backup Important Files
C:/Espion/DATABASE folder unless you have specifically saved them elsewhere.Diagnosys recommends backing up your databases regularly to an external media device, such as a CD or USB flash drive.

Along with your database(s), you will want to make copies of the following files, found in the
C:/Espion directory:ESLOCAL.INI- Local configuration settingsESIMP.CAL- Impedance calibration fileCOLDxxx.CAL- Calibration file for your ColorDome if you have one. xxx corresponds to the serial number of the ColorDome.COLBxxx.CAL- Calibration file for your ColorBurst if you have one.PSGxx.CAL- Calibration file for your PSG if you have one.Any custom files such as files containing logos / banners that you have created are stored in the Espion directory.
Note: You will need to know your console's serial number later. While the console S/N is found on the back of the system, it is often easier to look this up in the software (visible on the startup page) than it is to take a peek at the back of the E2 console, so be sure to note this down too.
Tip: If you don't have file extensions turned on, you can turn them on by opening the C:/Espion folder (or any folder), clicking on the Tools menu, selecting Folder Options, clicking on the View tab in the popup menu that appears, and make sure that Hide extensions for known file types is unchecked. 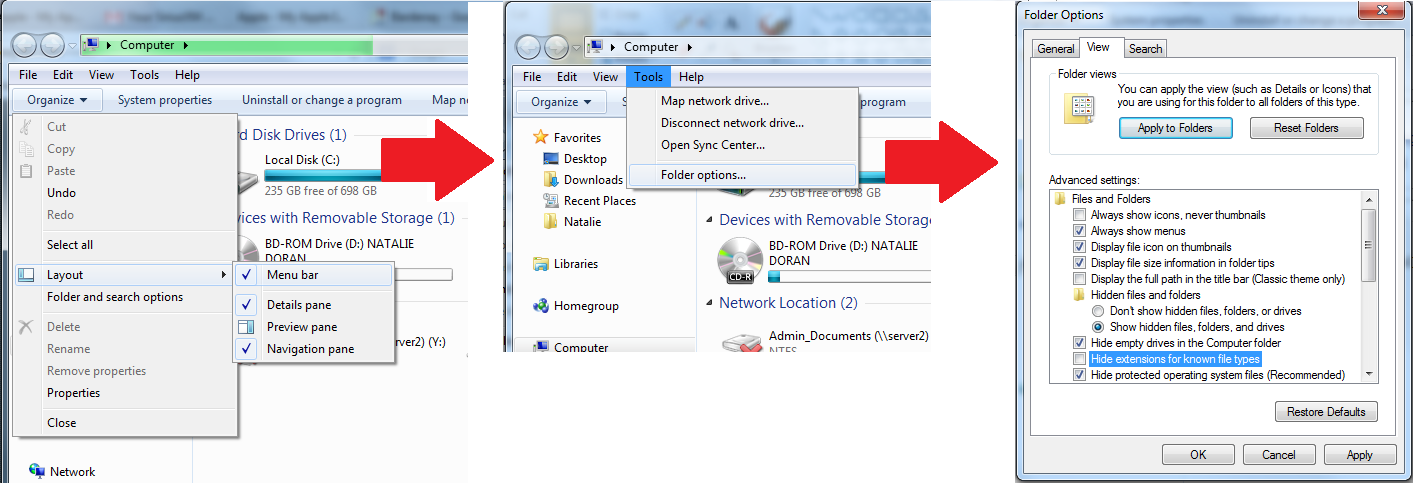
Step 2: Remove Old Dependencies
C:/Espion folder and Rename it to Espion
Old or similar.Important: The old version of the software will no longer work after upgrading.
2) PressCTRL+ALT+DEL to bring up the task manager (NB - On Vista, Win7, or Windows 10 machines, CTRL+SHIFT+ESC works better). Click the Processes tab at the top, then sort the processes by name by clicking the Image header. Scroll down until you find the processes ibguard.exe and ibserver.exe. End these two processes IN THAT ORDER.3) Open the
Windows Control Panel. From Add/Remove programs, uninstall both the Interbase Client and Server software.4) Browse to
C:\WINDOWS\SYSTEM32 and locate the file GDS32.DLL. Delete it. Touch absolutely nothing else in that folder.5) Browse to
C:\Program Files and find the folder entitled either InterBase or InterBase 2.0 and delete it.6) Reboot the machine. Press
CTRL+ALT+DEL (or CTRL+SHIFT+ESC) and check the Processes menu for ibguard.exe and ibserver.exe. If they are still present, repeat steps 2 through 5 until they vanish.Step 3: Setting Up New Software
Note: The V5 installation software will install the Espion software first, and then the new database management software. You MUST install both programs in order for your software to function.
Note: When installing Firebird (the database management software), you MUST choose that the software run as an Application and not a Service. 
C:\Espion V5 folder.Note: Diagnosys recommends placing your backup .GDB databases into the C:\Espion V5\Database folder to make finding them later easier.
Configure System, make the following changes:- Under
Hardware -> Console, make sure thatI/O Card Enabledischecked(Required to be able to acquire data). - Input
Console Serial NumberunderProgram -> Global -> Serial Number - Select
Country Type (USA/UK)to set date and time format, also underProgram -> Global. - Select
Mains Frequency (50/60)to set date and time format, also underProgram -> Global. If you are unsure what your mains frequency should be, you can check the list here. - Set the
Backup Frequency and Export Destination, found underProgram -> DatabaseandProgram -> Global, respectively.
Configure System menu and save the changes you've made. When the program returns to the start page, click on Database Center. Navigate to your old database, select it from the file list on the right, and click Connect in the upper right.

Important: At the lower right is a file filter which by default is set to look for only database files with the extension .FDB (new database file). You MUST change this filter to either Old Database File or All Files to be able to see your old database files.
4) Once connected to your old database, click the
Update button from the Database Control Center.
Note: Updating a database creates a new database with the old data in it. It does NOT delete or overwrite the old database.
Note: The update process can take quite some time, especially if the database in question is large.
Note: Only Firebird 2.0 is able to update .GDB files; version 6 and above will require assistance from Diagnosys.
Comments
0 comments
Please sign in to leave a comment.